Denali
-
P6 - Extremely physically demanding. Heavy pack weights and long days combine to test you to the limit. Not for the faint hearted. Long days of 10 hours plus with pack weights up to 20-25kg means that sheer exhaustion is likely. When in Nepal pack weight is greatly reduced due to help from porters.
Visit our Grading Information page for a full overview.
-
T5 - Competent Alpine climbing ability. Should be comfortable on Scottish Winter III ground or Alpine AD. Complete understanding and confidence in use of your technical kit will be required.
Visit our Grading Information page for a full overview.
Overview
Date & Prices
Pics & Vids
Itinerary
-
Kit List
FAQs
Overview
Denali, 6,194m, formerly known as Mount McKinley, is one of the most challenging 7 Summits. It sits an astonishing 5,200m above its North American plain, higher than the distance between Everest’s Base Camp and summit. An isolated daunting peak rising from untouched Alaskan wilderness, climbing it (often in 24-hour daylight) is a physical and emotional commitment and an irresistible challenge that attracts determined mountaineers the world over.
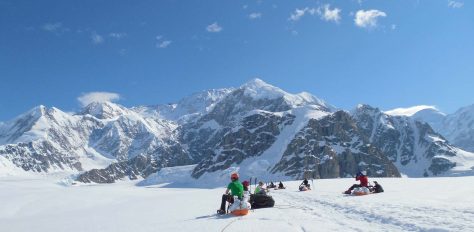
Our itinerary tackles the most popular West Buttress route in a summit attempt that can take up to 18 days. You’ll undertake a self-supported expedition, carrying a 30kg pack and pulling a 65kg sled up to 4,300m where the climbing becomes steeper leading us to high camp at 5,250m. Summit day involves a short traverse to Denali Pass which sits between the two summits and onwards and upwards to the short but exposed summit ridge where the views will blow you away. Denali will be a huge test of your endurance, inner strength and teamwork skills, and should not be underestimated.
Though technically straightforward, the demands of extreme climate, harsh storms and massive ascent combine to make Denali a tough mountain to take on. However the rewards are equally extreme: the climb is dramatic, the ethereal views exceptional, and the purity of your environment breathtaking.
Find out more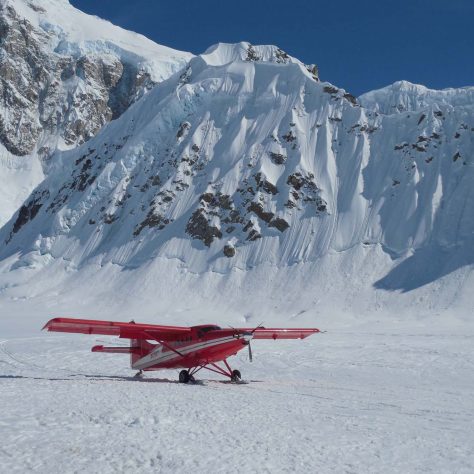
Date & Prices
For private trips or bespoke itineraries inc. different dates, please contact the 360 office on 0207 1834 360.
A monthly payment plan is possible, please contact the office to chat through the options.
For private trips or bespoke itineraries inc. different dates, please contact the 360 office on 0207 1834 360.
A monthly payment plan is possible, please contact the office to chat through the options.
We currently have no scheduled dates for this expedition, however if you give the office a call on 0207 1834 360 it would be easy for us to get this up and running.
Please note that if 360 is booking your international flights, a supplement may be applicable
if the flight budget (as seen above) is exceeded.
Please note that if 360 is booking your international flights, a supplement may be applicable
if the flight budget (as seen above) is exceeded.
Included
- International flights and taxes
- 2 nights in hotel in Anchorage on a B&B basis based at the start of the expedition
- Hotel/airport transfer in Anchorage
- Transfer from Talkeetna to Anchorage at expedition end
- Highly qualified expedition guide
- All group food and equipment on the mountain
- Transfers from Anchorage to Talkeetna and back on scheduled group transport
- All group camping equipment
- Discount at Cotswold Outdoor
- Monthly payment plan, on request
Not Included
- Lunches and dinners in Anchorage and Talkeetna
- Hotel accommodation on return to Talkeetna and Anchorage
- If the team is an odd number, a single supplement will apply on the first two nights which will be split between team members
- Personal equipment and Visas
- Personal expedition insurance
- National Park Service climbing fee (currently $365)
- National Park Service entrance fee (currently $10)
- Tips for the guides. (At your discretion)
- Airport transfers when not booking on with flights
- Any additional costs associated with leaving the expedition early for weather/personal reasons or having to extend the expedition
Pics & Vids
Itinerary
DAY 1 : Depart UK – Arrive in Anchorage
We fly across the Atlantic by day, arriving in Anchorage and transfer to our hotel for the night.
DAY 2 : Anchorage – Gear check
We spend the day in Anchorage going through our gear, making any last minute purchases, and meet our local support team and guides for a full briefing
DAY 3 : Talkeetna to Kahiltna Glacier (2,194m)
Our shuttle bus will drive us the 2½ hours to Talkeetna. We check in with the park rangers and receive their briefing before lunch. If flights are running we’ll head directly for the glacier to set up our base camp and spend some time crevasse training, organising our gear and fuel, and packing our pulks. The 45 minute flight is very dramatic in clear weather. If for whatever reason we can’t get to the glacier we’ll stay in Talkkeetna (additional cost not included, c $50).
DAY 4 : Camp 1 (2,378m)
We dig in our base camp gear and head up towards camp 1 below Ski Hill, ascending a total of 300m.
DAY 5 : Carry gear to Camp 2, return to Camp 1
Today is a load-moving day moving gear up to a cache at 3,048m near Kahiltna Pass beneath Camp 2 before returning back to Camp 1, making a 7 mile round trip.
DAY 6 : Camp 2 (3,413m)
We move ourselves and minimal gear up to camp 2 today gaining 1,035m of elevation.
DAY 7 : Camp 2 (3,413m)
We spend today heading back down to our cache to retrieve all of our gear and stay another night at camp 2 making a relatively short 1 mile round trip and making the most of the acclimatisation time.
DAY 8 : Carry to Windy Corner, return to Camp 2
We make a 4 ½ mile round trip to carry loads up to Windy corner at 4,238m before returning back to camp 2.
DAY 9 : Camp 3 (4,328m)
We move ourselves up to Camp 3, gaining nearly 1,000m in altitude, where the views of Mount Hunter and Mount Foraker are stunning, and the sunset over the whole range beggars belief.
DAY 10 : Camp 3 (4,328m)
We head back down to Windy Corner to retrieve the contents of our cache, a welcome round trip of just 1 mile after yesterday’s big day.
DAY 11 : Rest Day at Camp 3
We spend some time practicing fixed lines and moving as a rope team in preparation for the forthcoming days up high.
DAY 12 : Carry gear to 4,937m
We spend a day carrying gear up above the top of the fixed lines that protect about 280m of the “Headwall”, above which we gain the crest of the West Buttress that will eventually lead to High Camp. It will be a tough 2 ½ mile round trip.
DAY 13 : Possible rest day.
This day may be a rest day.
DAY 14 : High Camp (5,242m)
We leave the pulks behind now and pack all the expedition gear into our rucksacks for the strenuous ascent to High Camp. If we’re feeling strong, we can retrieve our cache on the way up or return the following day for it. Although it’s just a 1¾ mile day, we’re gaining almost 1,000m in altitude, and it will feel like it!
DAY 15 : Rest Day at High Camp
We take a well-earned day to regain our strength today at high camp in preparation for our summit attempt.
DAY 16 - 21 : Summit Days (6,193m)
The ascent from High Camp to the summit could take anything between 14 and 18 hours and could prove one of the hardest days of the entire expedition, but also one of the most rewarding – the culmination of several weeks of exertion and determination. Several days are allowed for in the summit attempt as it’s not uncommon to have to wait out through very high winds and extreme temperatures and very adverse weather for a window of opportunity to head to the top. The ascent itself is a big 5 mile round trip, gaining not far short of 1,000m to reach the summit.
DAY 21-22 : Descent days
It will take 2 full days to descend from High Camp to the landing strip and we’ll need to be there no later than 6am on day 23 of the expedition. We’ll spend two days walking 14 miles downhill.
DAY 23 : Talkeetna
With a bit of luck the weather will let us fly off the glacier and we head back to Talkeetna for a well-earned beer, shower, dinner and bed in no particular order. It is not uncommon for the weather to keep us in on the glacier a day or two more.
DAY 24 : Anchorage
Our minibus returns us back to Anchorage for one last night on the American continent.
DAY 25 : Overnight flight back home
An overnight flight will take us back home.
DAY 26 : Arrive UK
Today we arrive back home to friends and family so we can finally recount our adventure.
These are subject to minor changes depending on flight arrival and departure times, weather, group dynamics and fitness and so on, but the itinerary outlined provides an excellent indication of the expedition and what you will experience.
Kit List
Bags & Packs
Duffel bag 120ltr-140ltr
140L plus 100L duffel bags. A duffel bag is strong, soft, weather resistant bag without wheels but with functional straps for carrying. Suitcases are not recommended
Quantity: 2
Daysack
At least 60 – 80L capacity. Your day to day pack that you carry with your kit, fitted with shoulder straps and importantly a waist belt
Drybags
Nylon rolltop bags that keep fresh clothing and other important items like passports and iPods dry in the event of a total downpour that seeps into your kitbag. Good for quarantining old socks.
Please note that many countries are now banning plastic bags. We would always advise buying re-usable nylon rolltop bags for keeping your kit dry (and sustainability).
Sleeping Gear
5 Season sleeping bag
You should get a sleeping bag rated to -40C and choose a sleeping bag that functions within the comfort rating of this temperature. A silk sleeping bag liner will enhance this rating on the coldest nights
Sleeping bag liner
Silk is best for keeping the bag clean and you a little warmer
Sleeping mat
Full length Thermarest AND foam sleeping mat
Headwear
Warm headgear
This can be a warm hat, beanie, balaclava, anything to reduce the heat loss from your head
Wide brimmed hat
Keeps the sun off exposed areas like ears and the nape of the neck
Sunglasses
Sunglasses Cat 4 with side and nose protectors AND glacier goggles. Julbo is our preferred supplier
Face mask
To prevent cold burn and frostbite (Neoprene recommended)
Sunblock
Buy the highest SPF you can find as UV intensifies with altitude
Lip salve
Sun cream will not work on your lips and they are very susceptible to burn without proper protection
Upper Body
Base layer
This is the layer closest to the skin and its principal function is to draw (wick) moisture and sweat away from the skin. You can also get thermal base layers for use at higher altitudes that provide an additional insulative layer while still drawing sweat during times of high exertion
Quantity: 2
Mid layer
These are typically lightweight microfleeces or similar technology that provide varying degrees of warmth and insulation without being overly bulky or heavy to pack
Quantity: 2
Soft Shell (optional)
Optional – These should be windproof (not all are) and insulative. They are mostly made of soft polyester and sometimes resemble a neoprene finish which makes them very mobile and comfortable to wear. While offering a degree of weather repellence, they are not waterproof
Hard Shell
These jackets are thin, highly waterproof and windproof and worn over all other items of clothing. You’ll find these made of Gore-Tex or other proprietary waterproof yet breathable technology. Inexpensive hard shells that aren’t breathable will prevent evaporation, making you sweat intensely and are not recommended
Down jacket
These provide the best insulation and are worth every penny. Ask advice in the shop (or from us) when buying the jacket and mention you want it rated to -40C and the assistant will recommend the correct fill for you.
Light insulated jacket
A lighter jacket such as a Primaloft or lightweight down which can be worn at lower to mid altitudes is a great addition to your kit offering greater flexibility with layering
Warm gloves
2 pairs. Light weight liner gloves to fit inside a thicker pair of ski gloves
Expedition mitts with thermal liners
Preferably down filled
Lower Body
Mountaineering Soft Shell trousers
These tend to be polyester so they dry quickly weigh little in your pack. Consider a Schoeffel fabric or similar which is warmer and wind resistant
Down trousers
As per the jacket: lightweight, compressible, to provide effective lower body insulation once at altitude, ensure they are windproof and water resistant
Long Johns
Thermal insulation for the lower body
Quantity: 2
Waterproof trousers
Like the jacket, an essential piece of kit to stay dry and should also be Goretex
Down suit (optional)
Underwear
How many pairs you take is entirely up to you, consider longlegged
Feet
High altitude boots
These boots are double or triple layered to offer the best insulation and the warmest feet up high. Either La Sportiva G2 SMs, Scarpa Phantom 6000s, La Sportiva Spantiks or 8,000m boots are suitable. Make sure you can fit 2 pairs of socks for added warmth with room to wiggle your toes.
High altitude socks
These are especially thick to provide maximum insulation. Bring several pairs, keep one pair clean for summit day
Trekking socks
Thinner trekking socks to wear in combination with mountaineering socks
Camp shoes
Camp Booties so you’re not clomping around in your plastics the whole time
Gaiters
To protect the tops of your footwear from harsh conditions and to provide some added insulation
Overboots
Boot covers used for trekking in cold conditions
Technical Equipment
Snow shoes
A flat device attached to the sole of a boot and used for walking on snow
Trekking poles
Adjustable trekking poles
Ice axe
General mountaineering
Crampon compatible boots
Crampons and Spare Parts. 12 point with anti-balling plates
Mountaineering harness
We recommend Petzl harnesses
HMS Locking karabiners
Pear Shape HMS Locking Carabiner
Quantity: 3
Prusik loops
5’, 6’ and 13’ lengths of 6mm
Sling (120cm)
2 shoulder length, sewn
Climbing helmet
Hydration
Water bottles / bladder
2L equivalent – Camelbaks are not recommended as they have a tendency to freeze up, Nalgene bottles are better at altitude
Small thermal flask
An insulated Thermos flask 1L
Pee bottle (+ optional Shewee for the girls!)
A good idea if you are storm bound at higher camps. A 1ltr Nalgene bottle is a good option but do make sure you label it as your pee bottle!!
Toiletries
Wet wipes
These are great for washing when shower facilities become a thing of the past
Alcohol gel
A must have for good camp hygiene
Insect repellent
For early stages and once back down
Medications
Personal first aid kit
Blister patches, plasters, antiseptic, painkillers, (See FAQ’s in the following pages)
Personal medication
Keep this in your daypack
Miscellaneous
Thermal bottle insulators
Head torch
We recommend Petzl head torches. Bring spare batteries.
Camera
Bring plenty of spare batteries and memory cards
Penknife (optional)
Sewing kit (optional)
Cutlery
Plastic cutlery
Bowl / alpine mug
Plastic bowl/mug
Sewing kit (optional)
Snacks
Hand and foot warmers
To fit inside your mitts for summit day
Rubbish bag
Thermarest Repair Kit
Camp chair (optional)
Entertainment
Of course optional, but most trekkers like to bring an iPod, book, Kindle, cards etc for evening entertainment.
Solar Charger
These are useful to keep electricals charged but are a luxury rather than a necessity
Documentation
Passport
Don’t forget this! Your passport should have at least 6 months validity. With your passport expiry date at least six months after the final day of travel.
Copy of passport
Just in case
Visa
Visa or Visa waiver must be arranged beforehand
Dental check up
We recommend you have a dental check-up before your trip. New fillings can be an issue at altitude if there is an air pocket left in the gap
Money
We recommend you take around $500. This will allow for tip money plus any extras such as satellite phone calls and emergency funds
Travel insurance
Copy of own travel insurance details. And relevant contact numbers. We recommend looking into deals offered by the BMC, the Austrian Alpine Club or similar insurers. Team members should take out private insurance that covers you against cancellation due to medical or personal reasons and it is important that the insurance contains coverage for medical evacuations.
Many other insurance providers are available and we do recommend that you shop around to get the best cover for you on the expedition you are undertaking. It is your responsibility to ensure that you have the appropriate insurance for your intended trip. To include: medical evacuation and coverage up to the maximum altitude of this trip. Please contact the office if you have any queries on insurance for this expedition. We are happy to help.
FAQs
Food and Water
What is the food like on the mountain?
Breakfast and dinner are provided on this expedition. Breakfast often consists of granola, cereal, and oatmeal, on move days (moving camps) and at high camp when cooking is difficult. On rest days, meals can include pancakes, breakfast scrambles, breakfast sandwiches, etc. For dinners, we try to avoid dehydrated meals until the upper mountain. Dinner will often consist of a heavy carb (pasta, rice, instant potatoes) and a protein source (chicken, pork, etc.) to help with recovery.
Climbers on this expedition must pack and prepare their own lunch and snack foods. 360 will send you a lunch and snack food guide so you can develop your own meal plan for 21 days. Depending on when you arrive in Anchorage you will have the opportunity to shop on arrival if you do not wish to bring this with you from home
Where does the drinking water come from?
All drinking water will be made from gathering clean snow and then boiling this to produce purified water. It is up to you whether you wish to bring your own personal purification such as iodine or chlorine but normally boiling is the best method of purification.
Accommodation
How does tent sharing work? How big are the tents?
We use high quality 2 or 3 person tents that will be shared between two people. We recommend tent sharing for Denali. This is a remote route and as mountaineers we need to be self sufficient with our logistics. By sharing tents we keep the weight down of the equipment we need to carry and it will take less time in taking down or setting up camp.
Another important factor in tent sharing is to develop a buddy-buddy system where every team member can keep an eye on one another during the expedition in case one member develops a problem overnight. Their tent ‘buddy’ can then help look after them and notify the 360 Leader. This is especially important at altitude. Teamwork is the key to success.
What are the toilet facilities on the mountain?
There are no toilets on Denali. In accordance with Denali National Park guidelines we will take a lightweight container and special human waste disposal bags. The bags are placed in the container and business is done in them. Normally we try to create an improvised toilet by building a wall from snow blocks around the waste container. This allows you to have some privacy and offers protection from the elements.
Health and Safety
You advocate taking a small first aid kit, what should it have in it?
We advocate self-help on the mountain. Your own first aid kit should be small and light as any unnecessary weight should contain: A basic blister kit, plasters, your own personal medication, basic pain relief (paracetamol and Ibuprofen). We advocate only a very small and light personal first aid kit as weight will become an issue at altitude. Your Leader will be carrying a more comprehensive first aid kit including emergency high altitude medication should you require treatment.
What happens if there is a problem on the mountain?
Not only are you in the capable hands of our Leader and local guide but a mountain rescue service is also operated on Denali that includes helicopter evacuation if necessary. However, it is important to bear in mind that the emphasis is on self-rescue as the mountain rescue service is a voluntary rescue service and cannot be expected to help out. Bad weather conditions on Denali can also make it impossible for the helicopter to fly. It’s important to confirm that your travel insurance includes medical cover for evacuations.
Am I likely to suffer from altitude sickness on this expedition?
Our gradual itinerary allows people to acclimatise properly. Denali is a big mountain though and suffering from Acute Mountain Sickness (AMS) is not uncommon. Denali is even more notorious for the altitude due to the position being far from the equator and close to the Arctic Circle. This means that due to a decrease in the atmospheric pressure compared to similar altitudes at the equator, the relative altitude of Denali will feel even greater.
There are different types of altitude sickness. Although our acclimatisation regime ensures that everybody enjoys the best possible chance of getting high on the mountain, altitude related problems can happen. The most common of this is acute mountain sickness (AMS).
The most common symptoms for this are headaches and nausea.
In all this sounds quite dramatic but generally this is just the process your body naturally goes through to adjust to the higher altitudes and the reduced partial pressure of the atmosphere. For some people the acclimatisation process is a little longer and harder than others. For our leaders this is all part and parcel of ascending a mountain as high as Denali.
AMS might sound frightening but our leaders are fully trained (and experienced) in helping to relieve your personal symptoms and provide advice on how to best proceed.
What should I do if I start suffering from AMS?
There are some basic measures you can take to help yourself should you start suffering from AMS. As headache is the most common symptom of AMS try taking a simple painkiller such as paracetamol or ibuprofen to relieve the headache. If the headache disappears all well and good.
Please remember to inform your Leader of any altitude symptoms you may have and any medication you have taken as a result so they can keep an eye on you and advise accordingly. Most AMS symptoms will be mild but should AMS develop into a severe form, your team will be versed in dealing with this and will be carrying relevant emergency altitude medications.
Should someone develop severe AMS the only cure is descent and as safety is our priority you will be taken down appropriately.
What can I do to help prevent AMS?
In most cases AMS can be avoided by the following: drink plenty of water, walk slowly, stay warm and eat well – and listen and talk to your guides.
We recommend that you familiarise yourself with the various effects that altitude can cause. During your pre-climb briefing, we will describe altitude sickness to you in detail, and advise you how to cope with it.
The most important thing is not to fear it, but to respect it and to know how to deal with it and more importantly tell your guides how you feel.
Should I bring Diamox on the expedition with me?
We recommend you come armed with a course of Diamox or other high-altitude drug on this expedition, though we do not recommend that take you these as a prophylactic during the trek or climb. We view Diamox as a treatment drug rather than a preventative medicine. Most adventure medics give similar advice, however we do appreciate this can be confusing, as many GPs (who aren’t necessarily mountaineers) do suggest taking it as a prophylactic.
Here at 360 we pride ourselves on designing all our itineraries with acclimatisation front and centre and this expedition has been carefully designed to allow for your body to adjust to the altitude gradually, safely and comfortably. However, if you find that you are still having problems adjusting to the altitude (see our FAQ on Altitude Sickness) then your expedition leader or medic will recommend the correct course of action regarding taking Diamox.
Should I take Diamox?
It is far preferable to take Diamox if and when needed during the course of the expedition. If you are already taking it and then start having altitude related problems you are left with few options but to descend to a more comfortable altitude which sadly often means that the summit is not attainable.
Furthermore, Diamox is a diuretic, meaning you will have to drink a lot of fluid to prevent dehydration. Of course, the upshot of this is you’ll have to pee more which means you’ll probably be having to get up more in the night and take cover behind rocks during the day. Another quite common side-effect is that it can cause your extremities to “buzz and tingle” including your fingers, toes and lips which can feel quite unsettling. Other side-effects can include dizziness and light headedness with loss of appetite, nausea, vomiting and diarrhoea. Although all these side-effects are manageable when you have symptoms of altitude sickness, we personally believe it is counter-intuitive to take it unless necessary.
Of course, it is totally up to you, this is just our recommendation and we’re not doctors. If you do decide to take Diamox on the advice of your doctor then please do let your leader know in situ so they are aware of this. We also suggest you take the drug for a couple of days a few weeks before travelling so you can experience the symptoms before taking them during the trek.
Kit
What clothing should I wear on the mountain?
Denali can be an exceptionally cold mountain and it is essential to protect against hypothermia and frostbite. With your previous mountain experience you will already have an appreciation of how your body reacts to different environments. Every individual can be affected by the cold differently. As an example, those who feel the cold more could be wearing the following on summit night:
Head: Warm hat and underneath a windproof balaclava and neoprene facemask.
Upper torso: Multiple layers of thermal tops followed by a fleece jacket or soft shell, on top of all this a good quality down jacket.
Hands: Inner lining gloves made from polypropylene/ polyester and over these good quality down mittens. Hand warmers can also be very useful.
Lower torso: One or two sets of thermal bottoms or Long Johns. Over these will be the mountain pants followed by a pair of waterproof bottoms.
Feet: One set of thick mountaineering socks (a thin pair of polypropylene/polyester liner socks can be worn underneath). Be careful wearing two pairs of thick socks because if there is not enough air cushion between your foot and the boot you may find your feet getting colder instead of warmer!
All of the above attire can be useful lower down the mountain on exceptionally cold days such as when a bad weather system moves in.
What clothing should I wear on the mountain when the sun is out?
During the day if the sun is out you may find yourself very warm as the snow around you is good in reflecting the radiant heat back onto you. You may even find that you are only climbing wearing just one top but still feel warm.
This is the difficulty with Denali and other big mountains in that you are constantly climbing in extremes of temperature and so need to be prepared for all eventualities.
Will I need waterproofs?
Waterproofs are optional on Denali. You shouldn’t encounter rain on the mountain as you are above the snowline but you may have sleet or heavy snow. If you have alternative protection such as a water resistant softshell or down jacket with a pertex or similar coating, then this should protect you from becoming damp from the snow.
However, waterproofs can be a useful extra layer on top of both your lower and upper halves so you may wish to bring them with you depending on what other clothing you have for the mountain.
What is the best type of boot to use for Denali?
As frostbite poses a risk so please spare no expense on your footwear. You will not need any trekking boots so all you need to focus on is getting the right climbing boot. As Denali can become so cold it is advisable to wear boots normally reserved for climbing 8,000m peaks for this Denali expedition. These are normally triple layered boots and brands that make 8,000m peak boots include Scarpa, La Sportiva and Millet (please do not get confused with ‘Millets’!).
Should you go for something less than an 8,000m peak boot then we suggest go for something like La Sportiva ‘Spantiks’ as a minimum and consider suitable overboots.
What should I carry inside my rucksack?
You will be carrying all your kit! However, this will be divided between your rucksack and your pulk (sledge), see below.
Will we have to carry group gear on top of our personal equipment? How much will my pack weigh?
On top of your personal gear you will be expected to carry two group food bags (12 – 18kg each) and a handful of group gear such as shovels, wands, cooking gear, fuel, etc. On the lower mountain we will split our gear between our backpacks and a pulk or sled that we drag behind us.
Climbers typically put about 60% of their weight in the sled and 40% in their pack on lower-angled slopes. Most climbers start out with between 55 to 75kg of gear and food to manage. Much of a climber’s pack weight is made up of personal clothing and equipment, and so climbers with lighter and more modern clothing and equipment will carry less weight than those with older and more bulky items.
How warm does my sleeping bag need to be?
Your sleeping bag should be as warm as possible and at least rated down to minus 40°C comfort rating. Denali can be bitterly cold! Ensure you get a sleeping bag that has this temperature rating at the comfort rating rather than at the extreme rating. Remember that your sleeping bag can be further enhanced by the use of a silk or fleece liner. Sleeping bags work through the air being warmed up by your own body temperature.
Once you have warmed up the bag, the down will retain the heat and tries to ensure that you sleep at a temperature as close as possible to your own body temperature. To start with on the mountain it could be best to wear as little as possible when inside your sleeping bag. Our leaders will often only wear a set of thermals in their bag. It is important for the bag to trap the heat. If this doesn’t work they may added several layers but ensuring the sleeping bag around them isn’t too tight. If all else fails then it may be necessary to wear your down jacket in addition.
Is it possible to rent equipment before I go?
It is possible to rent climbing equipment both in the UK from Outdoorhire.co.uk and also once you arrive in country. However, we recommend the use of personal equipment whenever possible. This is so you know your equipment as best as possible and we can’t guarantee the quality of rented equipment. You also may not have much time to rent equipment when in country before heading to the mountain. We strongly recommend to have all your equipment prepared, tried and tested before setting off to Alaska.
Can I leave items I won’t need for the mountain in storage somewhere?
Yes, you can leave clean sets of clothes and whatever belongings won’t be needed for the mountain. These are normally left safely in storage with the local flight company prior to flying to the Kahiltna Glacier to start the climb.
The Climb
Why are there contingency days on the mountain?
Contingency days are strategically placed in the itinerary to maximise the chances of success for our groups. These extra days can be used for added acclimatisation if required by the group or will be valuable for the bad weather that frequents Denali.
The Weather
What is the best time of the year to climb the mountain?
The optimal climbing time to climb Denali tends to be May to July. The weather conditions tend to be more favourable during the glacier relatively stable.
What type of weather can be expected?
You need to be prepared for an extremely wide range of temperatures and conditions on Denali. The Kahiltna Glacier, which the West Buttress route follows, can experience some of the widest temperature swings on the planet. When the wind is calm and the sun is out, it can be extraordinarily hot, upwards of 25C. At the higher camps, or when a northerly system moves in, the temperatures can dip below -35C. It usually does not stay this cold for too long, but climbers can expect to see these kinds of lows for at least a few days during their climb.
Wind is perhaps the biggest danger on Denali, and climbers should be well prepared to fend off storms and protect themselves and their camps from windy conditions. Even when temperatures are mild, wind chill can accelerate the frostbite process and wreak havoc on equipment and camp sites. Winds in excess of 100mph have been recorded at 4,300m. On the other hand, climbers have walked to the summit in t-shirts. Be prepared for everything the mountain has to throw at you and then a little more.
Insurance
Do I need special travel insurance?
You must carry individual travel insurance to take part in the expedition. We cannot take you on the mountain without proof of insurance.
It is your responsibility to ensure that you have the appropriate insurance for your intended trip. To include medical evacuation and coverage up to the maximum altitude of this trip.
Your insurance details are requested on the booking form, however this can be arranged at a later date. 360 Expeditions will be requesting your insurance details 8 weeks before your departure.
Entry into Country
Do I need a visa to get into USA?
If you are a foreign national (not a US citizen) you will require a visa to enter USA. However, citizens from certain countries (including UK) can enter through a visa waiver program. To facilitate this you will need to apply for authorisation to travel through the Electronic System for Travel Authorisation (ESTA).
Training
How can I best train / prepare for climbing the mountain?
Obviously the best way to train for any expedition is to recreate the conditions of the climb as closely as possible. This can be difficult depending on where you are based geographically and we appreciate people have busy lives with work and family commitments.
Ideally you would have altitude experience from previous climbs and the more experience the better. Technically, you will need to be able to move competently using crampons on steep snow or ice and be able to perform an ice axe arrest. You should also be familiar with moving together roped up, have knowledge of basic knots and rope-work and have knowledge of crevasse rescue techniques, as well as some knowledge of how to build a snow anchor and set up a basic hauling system. If you are concerned about any lack of knowledge in these areas, we recommend doing a winter skills course with us in the Pyrenees before you attempt Denali.
The main area to focus physically is to build up as much endurance as possible. This can be developed by long hill days with your rucksack on your back carrying your kit. To simulate pulling the pulk some people train by pulling a tyre. The more miles you clock up in the hills prior to Denali, generally the more endurance you’ll have that will give you something in reserve when it counts during a long day on the mountain.
Finance
How much should we tip the staff?
Our local crew work extremely hard to assure that your expedition runs well. Although tipping is not compulsory, once someone sees the hard work the crew provides, tipping will seem the least they can do to say thank you. On Denali there is no average amount, each local guide and the main Leader can be tipped by individuals ranging from a few dollars to a few hundred dollars.
What additional spending money will we need?
What you wish to bring in personal spending money is entirely up to you. It is normally better to bring more than you think you need as occasionally we have group members asking us to lend them money but we still haven’t had one complaint of anyone taking too much money! The best currency to bring is US Dollars although there will be cash machines to withdraw money prior to the climb. Converting other currency into US Dollars while incountry can be time consuming. In addition to hard currency it is useful to bring a debit or credit card.
An average amount to bring is approximately $500 USD. This amount should incorporate enough money for tipping the local crew and Leader, buying souvenirs and alcoholic beverages. A bank card will be especially useful for purchasing any extra hotel nights needed after the climb.
Why aren’t the hotel nights on our return included in the trip cost?
As we mentioned at the end of the itinerary, the exact day we return from the glacier is often at the mercy of weather conditions, the climbing conditions and how quickly we make our way up the mountain and back down. We may not use all the days allowed for in the itinerary in town, or we may need more. In fact we don’t even make the bookings until we know when we are due to depart from the glacier so we have somebody stationed in Talkeetna to look after this aspect for us and ensure we are duly accommodated. To that end we ask that these nights are paid for locally to simplify the overall trip cost. The same goes for the outward journey if we can’t fly straight out to the glacier and need to spend an night in Talkneetna waiting for a weather window.
Electronics
Do we need a travel adaptor for the plug sockets in the hotel or are they the same as UK?
The voltage is 120v / 60Hz. Flat two-pin plugs are normally used.
Is there mobile phone reception on Denali?
There is no mobile phone reception on Denali. The Leader will be carrying a satellite phone primarily for emergencies but you may use this at a cost of $5 per minute.