Mera Peak Expedition
-
P4 - Sustained physical effort calls for a state of high conditioning. You should already have experience of tough challenges (P3) and be regularly training as part of your normal routine. Expect days of up to 8 hours and longer while carrying a pack up to 8-14kg in weight. Summit night could be easily in excess of 12 hours.
Visit our Grading Information page for a full overview.
-
T3 - May involve harder scrambling or some trekking and climbing with ropes. If snow is encountered then glacier travel with ropes, ice axes and crampons will be necessary. Basic climbing skills are ideal, but these will also be taught (and certainly practiced) during the expedition and pre-summit phase.
Visit our Grading Information page for a full overview.
Overview
Date & Prices
Pics & Vids
Itinerary
-
Kit List
FAQs
Overview
Mera Peak, at 6,476 m, is one of the most achievable trekking peaks in the Himalayas. With 360 Expeditions, you follow the little-visited jungle route offering incredible views of 5 of the world’s highest mountains, steady acclimatisation and unique cultural insights.
Avoiding the crowds, we trek through the stunningly beautiful Hinku Valley, meeting along the way local hill people in their environment and experiencing the rich Sherpa culture. There’s no rush to acclimatise as you pass through hidden yak pastures, rhododendron forests and stupa-crowned mountain passes. For the summit bid, we enter a land of ice and snow, following the majestic Mera glacier for two days all the way to the top. Our efforts are rewarded with one of the greatest views on Earth, including five mountains, all 8000m+ which span the crown of the Himalayas. Everest, Lhotse, Makalu and Cho Oyu close by, and to the east on the Indian border, Kangchenjunga. It’s a moment to cherish for life.
This itinerary has been carefully designed by our highly experienced 360 Expedition leaders and Khumbu Sherpas to optimise acclimatisation and maximise enjoyment. You’ll get full training on the equipment needed for your summit bid, so the Mera Peak expedition is ideal if you have some trekking under your belt and you are generally fit.
Find out more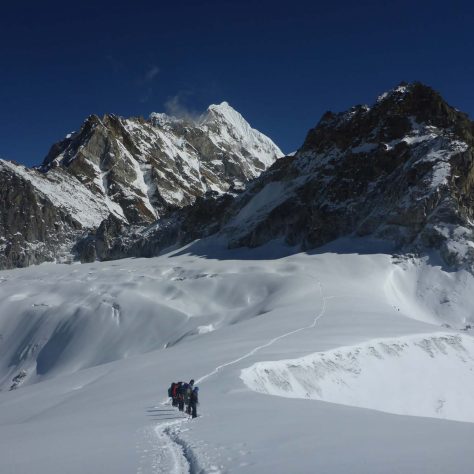
Date & Prices
For private trips or bespoke itineraries inc. different dates, please contact the 360 office on 0207 1834 360.
A monthly payment plan is possible, please contact the office to chat through the options.
For private trips or bespoke itineraries inc. different dates, please contact the 360 office on 0207 1834 360.
A monthly payment plan is possible, please contact the office to chat through the options.
Departure & Return
Duration
Land Only
Flight included
Start: 15 October 2024
End: 05 November 2024
Land Only:
£3,645
Flight Included:
£4,295
Leader: In conjunction with Rolfe
Start: 18 April 2025
End: 09 May 2025
Land Only:
£3,645
Flight Included:
£4,295
Leader: TBC
Start: 19 October 2025
End: 09 November 2025
Land Only:
£3,645
Flight Included:
£4,295
Leader: TBC
Please note that if 360 is booking your international flights, a supplement may be applicable
if the flight budget (as seen above) is exceeded.
Please note that if 360 is booking your international flights, a supplement may be applicable
if the flight budget (as seen above) is exceeded.
Included
- International and domestic flights plus taxes
- Local guides and a 360 guide (depending on group size)
- Porters
- Equipment and clothing for porters and local crew
- Tea house accommodation during the trek
- 3 nights camping during the summit phase
- Accommodation in Kathmandu in doubles / twins with breakfast
- Airport transfers and escort
- All accommodation based on two people sharing
- All food whilst on trek and breakfast when city-based
- Celebration meal
- Monthly payment plan, on request
Not Included
- Personal equipment
- Staff/guide gratuities
- Trip insurance
- Items of a personal nature: phone calls, laundry, room service, alcoholic beverages etc.
- Unscheduled hotels and restaurant meals e.g. if bad weather grounds flights or contingency days are not used
- Visas
- Lunch and dinner as indicated in the itinerary
- Airport transfers when not booking on with flights
- Any additional costs associated with leaving the expedition early including any airline surcharges as a result of changing return airline tickets
Pics & Vids
Itinerary
DAY 1 : Depart UK
Today we depart the UK, usually from London Heathrow.
DAY 2 : Arrive Kathmandu
We arrive into Kathmandu mid-afternoon and will transfer to our hotel, before some free time to explore the local area. We will meet back up late afternoon to have a briefing, and kit check, before what is sure to be a lively group dinner!
(D)
DAY 3 : Kathmandu to Mulkot
We have the morning to explore Kathmandu, a great opportunity to tour the city. In the early afternoon we depart for our transfer to the town of Mulkot, approximately 4½ hours drive. Here, we will spend the night ready for our early morning flight to Lukla and the start of our trek tomorrow.
(BD)
DAY 4 : Lukla (2,840m) to Phuiyan (2,796m)
We leave early for a transfer to Ramechhap (approximately 1 ½ hour drive) for our morning flight into Lukla. The views from the plane are amazing, providing dramatic scenes of terraced hills and the distant Himalayan giants.
At Lukla we meet the sherpas who will be looking after us for the duration of our expedition and begin our trek south keeping high above the spectacular Dudh Khosi. We’ll stop for lunch in Surkhe and then continue to the Sherpa village of Phuiyan (2,796m) where we’ll spend the night.
Trekking time: 4 – 6 hours
(BLD)
DAY 5 : Phuiyan - Pangkongma (2,946m)
We set off early and soon climb up a steep path to the pass of Khari La (2,990m). The view to the north and west is fantastic all the way to Cho Oyu. We stop for lunch at a small lodge, seemingly suspended over the wide Kharikhola valley below. The trail continues through gorgeous forests with many high waterfalls visible before reaching the stopping point for the day.
Overnight in Pangkongma.
Trekking time: 6 – 8 hours
(BLD)
DAY 6 : Pangkongma - Narjing Dingma (2,650m)
Another early morning start soon brings us up to the Pangkongma La pass (3,180m), which is marked by some very ancient chortens. From here we enter the Hinku valley where there is an immediate feeling of unspoilt remoteness. After a short hike, our objective Mera Peak comes into view standing at the head of the valley. From this angle, it looks hugely impressive as its immense walls reach straight out of the valley. We trend slowly downwards getting our first glimpse of the Hinku River crashing through inaccessible gorges down from the north. After lunch we head into deep forests before climbing to emerge in the village of Narjing Dingma.
Overnight in Narjing Dingma.
Trekking time: 6 – 8 hours
(BLD)
DAY 7 : Narjing Dingma - Chalem Kharka (3,450m)
Another spectacular day awaits. We enter rhododendron forest and climb Surkie La (3,085m) from where the whole of Eastern Nepal opens out in front of us. Kangchenjunga is visible from here and below us stretches the remote Hongu valley. We follow the north ridge for the morning and should arrive in the village of Chalem Kharka for lunch.
Overnight in Chalem Kharka.
Trekking time: 3 – 5 hours
(BLD)
DAY 8 : Chalem Kharka - Khula Kharka (4,120m)
Today we climb out of the valley and continue up to a ridge which in some places narrows dramatically and gullies drop away steeply on either side. There are great views of Kanchenjunga throughout today. One final pass at 4,330m brings us to the five sacred lakes of Panch Pokhari, a pilgrimage site for both Buddhists and Hindus. A short descent from here brings us to our rest point at Khula Kharka.
Overnight in Khula Kharka.
Trekking time: 4 – 6 hours
(BLD)
DAY 9 : Khula Kharka - Khote (3,480m)
Today we climb quickly to a high pass (4,300m) before traversing the valley side until another high pass is reached. After popping out we’ll descend through majestic forest and have lunch near a roaring Hinku river. Clearly visible around us is evidence of the devastation caused by a huge flood when the Sabai Tcho glacial lake broke its moraine dam. Mera Peak offers us glimpses of its summit at the end of the valley head.
A gentle climb brings us up to the established summer village of Khote deep in the Hinku valley.
Overnight in Khote.
Trekking time: 5 – 7 hours
(BLD)
DAY 10 : Khote - Tagnak (4,140m)
The forest gives way to an open valley and by mid-morning the summits of more 6,000m peaks are revealed. By early afternoon we’ll reach the summer settlement of Tagnak (4,140m) where we will spend the night. Towering over our heads the sheer flank of the Mera ridge dramatically dominates the skyline.
Overnight in Tagnak.
Trekking time: 4 – 6 hours
(BLD)
DAY 11 : Acclimatisation Day - Tagnak (4,140m)
We will spend two nights in Tagnak acclimatising to the altitude we have reached so far. This spectacular place is surrounded by dramatic peaks including Kussum Kangu (6,200m) and the unclimbed spire of Peak 35 (6,100m). We’ll take it easy and do some short explorative walks up to the glacier beyond the village.
Overnight in Tagnak.
Trekking time: up to 6 hours
(BLD)
DAY 12 : Tagnak - Khare (4,940m)
This morning’s walk up alongside the Dig Glacier is easy and relaxed. We cross the braided river and head into the valley, as dramatic views of the surrounding peaks continue to open up before us. We stop in Khare, our home for the next three nights.
Overnight in Khare.
Trekking time: around 3 hours
(BLD)
DAY 13 - 14 : Training and Acclimatisation - Khare (4,940m)
The next two days are all about training and acclimatisation.
We’ll take some time to head up to the start of the Mera Glacier by climbing a steep ridge that we will later follow to the Mera La Pass. Here we will practice crampon use, ice axe technique and self-arrest as we get the feel of jumaring on a fixed rope.
We’ll also spend some time at a training spot on the hillside near Khare for jumar practice and abseil training.
In the afternoon of day 14 we’ll sort our kit and rest ready to head up to High Camp tomorrow.
Overnight in Khare.
(BLD)
DAY 15 : Khare - Mera High Camp (5,800m)
An early start as we have a long ascent to Mera High Camp. Our freshly learned crampon and ice axe techniques will come in useful as we first climb back up the ridge and then onto the back of the Mera Glacier and our roped-up glacier crossing to Mera High Camp.
The views that open out beyond are really fantastic: Kanchanjunga, Chamlang, Makalu and Baruntse sweeping around from the east and Ama-Dablam, Cho Oyu and Kangtega to the west slowly but surely come into view.
The giant faces of Everest, Lhotse and Nuptse rise up in the north. The slopes are gently angled and the snow is usually in firm condition, but as the altitude increases it will be breathless work to reach the high camp. High camp is on a rock outcrop (5,800m) which separates the Mera from the Naulekh Glacier sweeping down from the peaks along the continuous ridge to the south. This has to be one of the most amazing camp viewpoints in the entire Himalaya and as an additional finale to a spectacular day, we are likely to get an amazing sunset.
Overnight in Mera High Camp.
Trekking time: 5 – 6 hours
(BLD)
DAY 16 : Mera Peak (6,476m)
We will be woken early by smiling Sherpas offering hot cups of tea and head out into the cold on our way to the summit of Mera Peak. Temperatures are likely to be ten degrees below zero but soon warm up as we continue up the glacier and onto the snow hump-back ridge. The first rays of the sun hit the big peaks in an amazing red glow. The route is still non-technical as we climb slowly but surely higher into the ever-thinning air. The slope steepens for a section behind the ridge and the summit comes back into view. At the foot of the final steep summit cone, we may attach to a fixed rope depending on conditions. The summit is only a few metres away. Shortly ahead will be the moment we have been working so hard to achieve: the summit itself. It’s a moment that is unforgettable. Before us will lie the 360 panorama of the Himalayan peaks, and only from Mera can you witness such a spectacle. We will spend some time taking it all in before we descend back down to Khare for a well-deserved round of celebratory drinks.
Climbing time: up to 9 hours return trip from High Camp
Trekking time: 2 – 3 hours High Camp to Khare
(BLD)
DAY 17 : Contingency day
A useful day which can be used for our descent or as an extra day to summit, weather depending. Flexibility is the key on expedition!
If this day is not utilised as a contingency day, then it will be used as a free day in Kathmandu.
(BLD)
DAY 18 : Khare - Khote (3,840m)
We retrace our steps back down the valley and alongside the Dig Glacier before passing back through Tagnak where we have our last good view of Mera before reaching Khote.
Overnight in Khote.
Trekking time: 5 – 7 hours
(BLD)
DAY 19 : Khote - Chetera (4,100m)
Our route stays high on the open hillsides west of the Hinku River making for a quicker return with some fantastic views back on Mera itself from a completely different angle. We spend the night at Chetera (4,100m), a small pastoral settlement by an enormous free-standing rock.
Trekking time: 6 – 8 hours
(BLD)
DAY 20 : Chetera via the Zatrawa La Pass (4,580m) to Lukla (2,840m)
The trail climbs to the Zatrawa La pass (4,580m) from where we get the last views of the mighty peak we have just climbed. From here we traverse to the rocky outcrop of the Zatr Og before descending steeply down into the Sherpa populated Dudh Kosi valley.
We reach the tourist bustle of Lukla which can often feel like a bit of a thriving metropolis after our time out in the mountains! We’ll make a start on celebrating our efforts, and enjoy a good night’s rest.
Trekking time: 8 – 10 hours
(BLD)
DAY 21 : Fly Lukla to Ramechhap. Transfer to Kathmandu
We return to Ramechhap on the earliest flight from Lukla, before our 6 hour transfer back to Kathmandu. The afternoon is yours to enjoy, shop for fascinating souvenirs, visit the palaces and markets, or simply enjoy some down time in this vibrant city. A couple of 360 favourites are the Monkey Temple, a Buddhist temple situated on a small hill that offers panoramic views of the city, and the Pashupatinath Temple, one of the most famous Hindu temples in Nepal. Tonight, we regroup for a celebration meal at the Roadhouse.
(BD)
DAY 22 : Depart Kathmandu
Today’s timings are dependent on your international flights.
If 360 are securing your flights, you will either be departing Kathmandu on a day flight, arriving back to the UK the same day, or you will depart on an evening / night flight and arrive back into the UK the next day (Day 23).
This will be dictated by flight routes, times and costs and if you tick “flights included”, then 360 team will do their utmost to find the most appropriate flights, giving you the best options. Please do let the office team know at the time of booking if you have a preference, and we will always do our best to accommodate.
(B)
These are subject to minor changes depending on flight arrival and departure times, weather, group dynamics and fitness and so on, but the itinerary outlined provides an excellent indication of the trek and what you will experience.
Kit List
Bags & Packs
Duffel bag 120ltr-140ltr
A 120-140L duffel bag to transport kit. A duffel bag is a strong, soft, weather resistant bag without wheels but with functional straps for carrying. Suitcases and wheeled bags are not suitable
Daysack
Approx. 40L capacity. Your day to day pack that you carry with your daily essentials, fitted with shoulder straps and importantly a waist belt
Waterproof rucksack cover
To protect rucksack from rain
Drybags
Nylon rolltop bags (or even just large plastic bags) that keep fresh clothing and other important items like passports and iPods dry in the event of a total downpour that seeps into your kitbag. Good for quarantining old socks
Small kit bag or light bag
This is for any kit you intend to leave at the hotel and could even simply be a heavy duty plastic bag
Padlocks
For use on your kit bag for travel and on the expedition plus your hotel bag
Quantity: 2
Sleeping Gear
5 Season sleeping bag
You should get a sleeping bag rated to -25C and choose a sleeping bag that functions within the comfort rating of this temperature. A silk sleeping bag liner will enhance this rating on the coldest nights
Sleeping bag liner
Silk is best for keeping the bag clean and you a little warmer
Sleeping mat
A full length self-inflating rather than ¾ length Thermarest
Headwear
Warm headgear
This can be a warm hat, beanie, balaclava, anything to reduce the heat loss from your head
Quantity: 2
Wide brimmed hat
Keeps the sun off exposed areas like ears and the nape of the neck
Buff/Scarf
Essential for protection from the sun and dust
Sunglasses
Worth spending money on good UV filters. For glacier work category 4 with side and nose protectors. Julbo is our preferred supplier
Ski goggles
Category 3 for days when it may be snowing and very windy. Very useful on summit day
Sunblock
Buy the highest SPF you can find as UV intensifies with altitude
Lip salve
Sun cream will not work on your lips and they are very susceptible to burn without proper protection
Upper Body
Base layer
This is the layer closest to the skin and its principal function is to draw (wick) moisture and sweat away from the skin. You can also get thermal base layers for use at higher altitudes that provide an additional insulative layer while still drawing sweat during times of high exertion
Quantity: 3
Mid layer
These are typically lightweight microfleeces or similar technology that provide varying degrees of warmth and insulation without being overly bulky or heavy to pack
Quantity: 2
Gilet (optional)
Optional – A great low volume additional layer to keep your core warm, whether down, primaloft or fleece
Light insulated jacket
A lighter jacket such as a Primaloft or lightweight down which can be worn at lower to mid altitudes is a great addition to your kit offering greater flexibility with layering
Soft Shell (optional)
Optional – These should be windproof (not all are) and insulative. They are mostly made of soft polyester and sometimes resemble a neoprene finish which makes them very mobile and comfortable to wear. While offering a degree of weather repellence, they are not waterproof
Hard Shell
These jackets are thin, highly waterproof and windproof and worn over all other items of clothing. You’ll find these made of Gore-Tex or other proprietary waterproof yet breathable technology. Inexpensive hard shells that aren’t breathable will prevent evaporation, making you sweat intensely and are not recommended
Down jacket
These provide the best insulation and are worth every penny. Ask advice in the shop (or from us) when buying the jacket and mention you want it rated to -25C and the assistant will recommend the correct fill for you
Warm gloves
Consider liners or a light polartec pair for lower altitudes and evenings, and a thicker waterproof pair like ski gloves for higher altitudes
Down mitts & waterproof mitts
Essential for higher altitudes and cold temperatures. To be worn with a liner glove underneath and waterproof & windproof layer over the top.
Lower Body
Trekking trousers
These tend to be polyester so they dry quickly after a shower and weigh little in your pack. Consider perhaps a pair with detachable lower legs as an alternative to shorts
Quantity: 2
Softshell trousers
Windproof or thermal lined trekking trousers for higher altitudes and the summit phase. Thermal leggings can still be worn underneath if necessary
Waterproof overtrousers
Like the jacket an essential piece of kit to stay dry and should also be Goretex
Long Johns
Thermal insulation for the lower body
Quantity: 2
Underwear
Merino or wicking material, not cotton. How many pairs you take is entirely up to you
Feet
High altitude boots
These boots are double or triple layered to offer the best insulation and the warmest feet up high. Either La Sportiva G2 SMs, Scarpa Phantom 6000s, La Sportiva Spantiks or 8,000m boots are suitable. Make sure you can fit 2 pairs of socks for added warmth with room to wiggle your toes.
3-4 season walking boots
Well worn in 3-4 season waterproof boots with mid to high ankle support
Trainers
For evening use and to give your feet a break once we reach the lodges
Trekking socks
Start with lighter socks lower down, working up to thicker pairs for higher up as it gets colder. Some people like a clean pair every day, others are happy to change every other day – that’s a personal choice
Quantity: 4
High altitude socks
These are especially thick to provide maximum insulation. Bring two pairs, keep one pair clean for summit day, and wear with a thinner inner
Quantity: 2
Spare laces
Just in case
Technical Equipment
Climbing harness
We recommend Petzl harnesses. Try a variety on in a shop before you buy to ensure a good fit. Legs clips are a good option and avoids having to step into the harness to put it on
Climbing helmet
A plastic helmet is more suitable rather than the expanded foam helmets available. Make sure you try it on in a shop with a woolly/fleece hat underneath
HMS Locking karabiners
Climbing equipment, for attaching a rope to your harness
Quantity: 2
Sling (60cm)
60cm slings
Quantity: 2
Ice axe
A walking ice axe between 55cm and 65cm. Go to an outdoor shop and try different ones for weight and size so that you get one that feels good to you
Crampons
12 point mountaineering crampons with anti-balling plates that fit your specific plastic boots (not ice climbing crampons)
Micro crampons
Only needed if on an expedition in Spring.
A smaller style of crampon, designed to give you a bit more grip on more icy terrain when full crampons are too much, or if you’re wearing lighter boots. Microspikes can be invaluable on slippery slopes, and we would suggest they are carried in your day pack with you when higher up on the hill. Please note these cannot be hired in situ – but as they are only around £15 to buy in Nepal they’re hopefully a good little investment for you anyway!
(There’s an example here, though other brands and styles are of course available.)
Jumar
Left or right handed, your choice
Hydration
Water bottles/bladder
3L equivalent – Camelbaks are useful at lower altitudes but have a tendency to freeze up at higher altitudes without insulation tubes, Nalgene bottles are better at altitude. We suggest a combination of a 2L bladder and 1L bottle or 2 x ½L bottles to put in your jacket for summit night
Pee bottle (+ optional Shewee for the girls!)
A good idea if you are storm bound at higher camps. A 1ltr Nalgene bottle is a good option but do make sure you label it as your pee bottle!!
Water purification
Although generally all water is boiled some prefer to double up and add purification tabs as well. Always good to have in your bag
Toiletries
Wash kit
Keep it simple on the mountain. Essentials are handsoap, toothbrush, toothpaste and deodorant. Moisturiser is advisable, everything else is a luxury!
Travel towel
Travel towels from the likes of Lifesystems are perfect
Wet wipes
Preferably biodegradable, these are great for washing when modern shower facilities become a thing of the past.
Alcohol gel
A must have for good camp hygiene
Quantity: Atleast 750ml
Insect repellent
For early stages and once back down
Toilet paper
Not provided, you’ll need to carry quite a bit with you.
Quantity: 3+
Nappy sacks or dog poo bags
Only needed to bag your toilet paper if you are caught short.
Medications
Personal first aid kit
Your own first aid kit should contain: A basic blister kit, plasters, antiseptic, sun-protection, any personal medication, basic pain relief (paracetamol/aspirin/ibuprofen), strepsils, anti-nauseau, a personal course of antibiotics if prone to illness etc.
Personal medication
Keep this in your daysack
Miscellaneous
Head torch
Bring spare batteries
Trekking poles
These tend to be a personal preference but help with your stability and can dampen the pressure on the knees coming down hill
Hand warmers
Camera
Bring plenty of spare batteries and memory cards
Snacks
You will be fed very well and given snacks each day however we advise bringing a small selection as a little bit of comfort. Extra snacks can be bought en-route if needed.
Entertainment
Of course optional, but most trekkers like to bring an iPod, book, Kindle, cards etc for evening entertainment.
Solar Charger
These are useful to keep electricals charged but are a luxury rather than a necessity
Dental check up
We recommend you have a dental check-up before your trip. New fillings can be an issue at altitude if there is an air pocket left in the gap
Documentation
Passport
Don’t forget this! Your passport should have at least 6 months validity. With your passport expiry date at least six months after the final day of travel.
Copy of passport
Just in case
Visa
A visa can either be obtained easily on arrival at Kathmandu airport, alternatively you can collect it from the Nepalese Embassy in London.
Money
You will need to carry some US Dollars with you. Please refer to our Finance FAQs for our recommended amount.
Travel insurance
Copy of own travel insurance details. And relevant contact numbers.
We have a partnership with True Traveller and would recommend that you contact them when looking for travel insurance for your trip with 360. However, it is vital that you ensure that the insurance cover they offer is suitable for you, taking your personal circumstances (items to be insured, cancellation cover, medical history) into account. Many other insurance providers are available and we do recommend that you shop around to get the best cover for you on the expedition you are undertaking.
It is your responsibility to ensure that you have the appropriate insurance for your intended trip. To include medical evacuation and coverage up to the maximum altitude of this trip.
FAQs
Country
What country information do you have?
Nepal, officially the Federal Democratic Republic of Nepal, is located in the Himalayas with a population of approximately 27 million. Bordered to the north by the China, and to the south, east, and west by India and across the Himalayas lies the Tibet.
A monarchy throughout most of its history, Nepal was ruled by the Shah dynasty of kings from 1768, when Prithvi Narayan Shah unified its many small kingdoms. However, a decade-long Civil War by the Communist Party of Nepal and several weeks of mass protests by all major political parties led to elections for a constituent assembly in May 2008 which overwhelmingly favored the abdication of the Nepali monarch Gyanendra Shah and the establishment of a federal multiparty representative democratic republic. Kathmandu is the nation’s capital and the country’s largest city. Kathmandu Valley itself has estimated population of 5 million.
Nepal has a rich geography. The mountainous north has eight of the world’s ten tallest mountains, including the highest point on Earth, Mount Everest, called Sagarmatha in Nepali. It contains more than 240 peaks over 6,096 m above sea level. The fertile and humid south is heavily urbanized.
How would you describe the Sherpa people?
The Sherpa people are the predominant ethnic group living in the eastern Himalayan region of Nepal. In 2001 there were approximately 150,000 Sherpas in Nepal. Their language is a variant of Tibetan. Sherpas belong to the Nyingmapa, the “Red Hat Sect” of Tibetan Buddhism. Allegedly the oldest Buddhist sect in Tibet, it emphasizes mysticism and local deities shared by the pre-Buddhist Bon religion, which has shamanic elements, in addition to Buddha and the great Buddhist divinities, the Sherpa also have believe in numerous gods and demons who are believed to inhabit every mountain, cave, and forest. These have to be worshiped or appeased through ancient practices that have been woven into the fabric of Buddhist ritual life. Indeed, it is almost impossible to distinguish between Bon practices and Buddhism.
Sherpas are highly regarded as elite mountaineers. They were immeasurably valuable to early explorers of the Himalayas, serving as guides at the extreme altitudes of the peaks and passes in the region, particularly for expeditions to climb Mt. Everest. Today, Sherpa is a term often used casually to refer to almost any guide or porter hired for mountaineering expeditions in the Himalayas. Sherpas are renowned in the international climbing and mountaineering community for their hardiness, expertise, and experience at high altitudes. It has been speculated that a portion of the Sherpas’ climbing ability is the result of a genetic adaptation to living in high altitudes.
The Climb
What is the skill level of this climb?
While technical skills are not necessary, it is strongly recommended that climbers have a basic grounding in the use of crampons and ice axes. Although billed as Nepal’s highest trekking peak the nature of this expedition is more akin to a mountaineering expedition than a trekking holiday. The mountain is covered in snow and quite a lot of time is spent climbing a glacier.
How fit do I need to be for this expedition?
Climbers are expected to be in good physical condition. The better your physical shape the more you will be able to handle the demands of trekking to the base camp and then climbing the peak. Having a good level of fitness will allow you to enjoy the expedition all the better and increase your chances of reaching the summit. Summit day can be up to 12 hours long.
How out of my comfort zone will I be?
Although you will be hunkered down in tea-houses for most of this expedition, you will be camping once we reach the Mera High Camp. You are likely to be cold and washing and toilet facilities will be limited. Your appetite may be affected by the altitude and as you get higher on the trek you may suffer shortness of breath and have difficulty sleeping. Remember that everyone on the trek is likely to be experiencing exactly the same symptoms, physical and mental.
How many climbers are on this expedition?
Rarely more than 12. Typically a group has between 6 to 8 climbers.
Can I contact the others on the climb? How about the guide?
Generally about 1 month before your trip departure we will create a WhatsApp group where you can start to chat to your team members.
You can call our office at any time and talk to us and/or your guide to discuss any aspect of your expedition.
Guides
Where do I meet my Guide?
Your guide will either meet you at the airport in the UK or in Kathmandu. Specific details on this will be shared with you when you’re close to your departure.
What is the guiding team composed of? How many guides? Climber to guide ratio?
Our 360 guides are some of the most experienced in the business. They spend many months a year climbing and trekking in Nepal and have established a close rapport with our ground crew.
Generally, your 360 leader will be in charge of the expedition and he/she will be assisted by the local guides. For the actual mountain phase (as opposed to the trekking phase) we have a 3:1 ratio between you and Climbing Sherpas to allow us to look after you properly.
Health and Safety
What happens if there is a problem on the mountain?
All our guides are in communication with each other by phone and radio. In the vast majority of cases of emergency rescue the problems can be attributed to slow acclimatisation or altitude and if so the solution is immediate descent to lower altitudes. Our local crew is very experienced in dealing with any problem that may arise. Our guides are either doctors or possess the highest standard of wilderness first aid qualifications and can handle emergencies to the highest level of competency without assistance if necessary.
Am I likely to suffer from altitude sickness on this expedition?
There are different types of altitude sickness. Although our acclimatisation regime ensures that everybody enjoys the best possible chance of getting high on the mountain, altitude related problems can happen. The most common of this is high altitude sickness – AMS (Acute Mountain Sickness). Symptoms for this can include headaches, nausea and vomiting.
This sounds quite dramatic but generally this is just the process your body naturally goes through to adjust to the higher altitudes and the reduced partial pressure of the atmosphere. For some people the acclimatisation process takes a little longer than others.
For our guides this is all part and parcel of ascending a near 6,500m peak and, although we assess each client’s personal situation carefully, we also further consider the compounding effects of dehydration brought on by excessive vomiting and loss of appetite.
AMS might sound frightening but our guides are fully trained (and experienced) in helping relieve your symptoms and providing advice on how to best proceed.
What can I do to help prevent AMS?
In most cases AMS can be avoided by the following: drink plenty of water, walk slowly, stay warm and eat well – and listen and talk to your guides.
We recommend that you familiarise yourself with the various effects that altitude can cause. During your pre-climb briefing, we will describe altitude sickness to you in detail, and advise you how to cope with it.
The most important thing is not to fear it, but to respect it and to know how to deal with it and more importantly tell your guides how you feel. Our guides have seen every condition that the mountain produces, and they will always know how to deal with problems.
Is there a risk of getting HACE (High Altitude Cerebral Edema) and HAPE (High Altitude Pulmonary Edema) on the mountain?
HACE and HAPE can occur on Mera and our guides are fully trained in the recognition of the onset of these problems and will deal with them at the first sign of their development.
Should I bring Diamox on the expedition with me?
Although we recommend you come armed with a course of Diamox or other high-altitude drug on this expedition, we do not recommend that take you these as a prophylactic during the trek or climb. We view Diamox as a treatment drug rather than a preventative medicine. Most adventure medics give similar advice, however we do appreciate this can be confusing, as many GPs (who aren’t necessarily mountaineers) do suggest taking it as a prophylactic.
We pride ourselves on designing all our itineraries with acclimatisation very much front and centre and this expedition itinerary has been carefully designed to allow for your body to adjust to the altitude gradually, safely and comfortably. However, if you find that you are still having problems adjusting to the altitude (see our FAQ on Altitude Sickness) then your expedition leader or expedition medic will recommend the correct course of action regarding taking Diamox.
Should I take Diamox?
It is far preferable to take Diamox if and when needed during the course of the expedition. If you are already taking it and then start having altitude related problems you are left with few options but to descend to a more comfortable altitude which sadly often means that the summit is not attainable.
Furthermore, Diamox is a diuretic, meaning you will have to drink a lot of fluid to prevent dehydration. Of course, the upshot of this is you’ll have to pee more which means you’ll probably be having to get up more in the night and take cover behind rocks during the day. Another quite common side-effect is that it can cause your extremities to “buzz and tingle” including your fingers, toes and lips which can feel quite unsettling. Other side-effects can include dizziness and light headedness with loss of appetite, nausea, vomiting and diarrhoea. Although all these side-effects are manageable when you have symptoms of altitude sickness, we personally believe it is counter-intuitive to take it unless necessary.
Of course, it is totally up to you, this is just our recommendation and we’re not doctors. If you do decide to take Diamox on the advice of your doctor then please do let your leader know in situ so they are aware of this. We also suggest you take the drug for a couple of days a few weeks before travelling so you can experience the symptoms before taking them during the trek.
What happens if I am unable to complete the expedition due to ill-health or altitude sickness?
Unfortunately people can get ill on the mountain. Your expedition leader is constantly monitoring your health and should you get ill with either altitude sickness or any other illness he will be discussing your options with you from an early stage.
Should it become apparent that you are unlikely to be able to summit (without it being a life-threatening situation requiring a medivac) you will be turned around accompanied by one of our experienced Sherpas at all times until the group rejoins you. As this is outside the itinerary you would need to meet any additional costs incurred as a result, and that is why we insist on travel insurance.
You advocate taking a small first aid kit, what should it have in it?
We advocate a little bit of self-help on the mountain. If you have a blister developing for example then please stop, take off your boot and treat it before it becomes a problem.
Your own first aid kit should contain: A basic blister kit, plasters, antiseptic, sun-protection, your own personal medication (sometimes your luggage might get to the tea-house/camps after you, so you may not be able to take your medicine according to the regime you are used to), basic pain relief (paracetamol/aspirin/ibuprofen), strepsils, anti-nauseau, a personal course of antibiotics if prone to illness etc.
Generally the best approach to take when packing your first aid kit is to include the basic medications you would on a family or personal holiday.
Your 360 expedition leader and / or a local porter (we call the ambulance man!) carries a very comprehensive first aid kit which contains a wide range of supplies and medications. They are fully trained to use whatever is needed for any emergency that may arise. We advocate keeping this in mind when packing your own first aid supplies and keeping your own first aid kit as compact and light as possible.
Do I need to take Malaria drugs?
The Malaria protozoa generally do not survive over an altitude of 1,500m so once we have started the trek malaria poses no threat (Lukla is at 2,700m). When visiting the lowland regions of Nepal it may be advisable to seek advice about if and when to take the malarial prophylactics. When visiting the chances of contracting malaria can be reduced by standard precautions such as sleeping under mosquito nets, applying insect repellent and wearing long sleeve shirts and trousers. Our leaders do not take anti-malarials with them.
We suggest you visit your local doctor before departure to get the latest advice. If you struggle to get an appointment MASTA Travel Health clinics, or many larger local hospitals have travel clinics.
What vaccinations do I need?
The following vaccinations are recommended:
- Hepatitis A
- Typhoid
- Diphtheria
- Tetanus
- Polio
This list is not absolute and it is important you should see your GP Surgery or travel clinic for latest recommendations and to ensure you are up to date on necessary vaccinations.
Training
Any tips on how a climber can maximise their chances of success?
The 360 training programs have been devised to be expedition specific. Use these as a guide but also feel free to contact us for individual advice on how to best incorporate the best suitable fitness program with your own lifestyle.
The idea is to increase the intensity of the exercise over 4 to 6 months before you leave for the expedition. Concentrate on cardiovascular work-outs during the initial weeks by taking short runs when time allows and try to spend at least 2 weekends a month going on long duration walks (longer than 6 hrs) carrying a rucksack of around 10kg. As you get stronger increase this rate of exercise and the duration by walking every weekend and running 5km every second day.
A focused regime will not only prepare your body for carrying minor loads but will harden your body against the big days on the mountain itself. In addition the weekend walks will help break in your boots and get you used to your equipment. In combination this will pay dividends when you reach Mera Peak because even though you can’t train for altitude your body will be ready for arduous days and you will be familiar with how to best use your equipment.
Food and Water
What is the food like on the mountain?
All meals on the mountain are fresh, nutritious and varied. We try to ensure that dietary preferences are met and that local ingredients are used. You’ll be amazed what can be produced on a kerosene stove!
The underlying aim is to provide balanced, nutritional meals packed with carbohydrates to refuel hungry bodies and to replenish stores for the next day of activity. On top of well balanced meals clients are provided with coffee, tea and snacks on arrival into camp. The morning wake-up call is usually accompanied by a cup of tea or coffee in your tent.
You are invited to bring along any of your favourite snacks and goodie bags from home if you want. Concentrate on high energy food-stuffs to give you that little boost on an arduous day.
I have food allergies, can these be catered for?
Absolutely, please inform the office of any allergies or intolerances and we will ensure that these are taken into account on the trek.
Where does the drinking water come from?
For the first day bottled drinking water will be used. At the higher camps we will use locally sourced drinking water from streams or springs. These are usually fresh being topped up from melt-water above or by rainfall but we also increase their purity by treating the water with purification chemicals and by boiling it. We always ensure that our drinking water is 100% bug free.
How often is fresh water available for replenishing during the day?
Before leaving the tea houses/camp in the morning you will fill your water bottles or camel bladder. If this runs low you will have ample more water to replace it with. For most walking days water can be replenished at the lunchtime site. In Nepal water and soft drinks can be bought at some of the lodges encountered on the route.
Accommodation
What kind of accommodation is there on the trek?
Most nights of the itinerary will be spent in teahouses which vary in their quality and style depending on their location. Generally they have a communal room downstairs, with one or two bedrooms above them. Some have shower facilities, some will just have a stand pipe, and there are shared toilet facilities. They use a type of wood burning stove in the main communal area. Other rooms are generally unheated.
There are no facilities for changing money in the teahouses. We recommend that you organise sufficient cash in Kathmandu, your local guide can advise on this.
There is electricity in many of the teahouses at lower altitudes, but not when you get higher and the teahouses become more basic. A top tip for making your batteries last a little longer is to put them in the inside pocket of your coat or under your pillow at night. Cooler temperatures drain battery life so keeping them warm will ensure they last longer.
What are the tea-house facilities like?
The tea-houses are very basic and you will need to come with an open mind. Everything is brought up on the back of a porter so often they might not feel much more than a basic shed. They can also be very difficult to keep clean so they can potentially feel a little grimy.
The facilities are incredibly basic. A hole in the ground will often serve as a loo which can be very overwhelming and off putting. If there is a shower it will be a ‘paid’ experience and may be a bucket wash. Many don’t bother as they don’t look very inviting.
We ask that you keep in mind that this is an adventure, and try and take the situation in your stride. Hand gel and wet wipes are a must!
How will I stay clean?
There is no getting away from it, hygiene in tea-houses is very basic. They have a lot of demand and the weather and location doesn’t help. Although its hard to embrace, it is part of the experience and you should approach it with a ‘we’re on an adventure’ attitude.
You will be using hand gel frequently and will be washing with wet wipes.
Once back in Kathmandu you will revel in the delights of a flushing loo and running water!
What about camping?
You’ll be camping for a couple of nights whilst summiting Mera. We use high quality 3 man tents to be shared between 2 people which provides extra space for your comfort.
Will I have my own room/tent?
Most altitude related symptoms manifest themselves at night. We therefore recommend room/tent sharing for our Mera expedition. Room share is always organised according to similar sex and where possible age groups. Obviously if climbing this mountain with a friend or partner then you will be able to share rooms and if you’re a group we’ll ask you to make your own arrangements.
If you have joined the team by yourself then it is highly likely that you will be sharing a room/tent with a pre-assigned room buddy, unless prior arrangements have been made.
If you would rather sleep solo, that’s also possible to organise – please see the next FAQ.
If I want my own room/tent how much will this cost?
We can make the arrangements for you to sleep solo throughout this expedition, if that’s what you’d prefer.
If you want a single room in Kathmandu only, it will cost £125 and if you’d like a single room throughout your expedition it will cost £475.
Will the camp be freshly set up or will we be staying at existing camps at a set site?
Our local camp crew will set up the tents for you on camping nights. We send them ahead of the group to secure the best site and to get the site prepared before you arrive. Bear in mind that these guys are also porters and when our walking days are shorter we might get to camp before them. If this occurs then have a cup of tea in the dining tent and wait for your tents to be ready
Kit
What clothing should I wear on the mountain?
We advocate the beg, steal and borrow principle for first timers: instead of buying brand new stuff that may never get used again. The cost of equipment is usually a major deterrent for people coming onto trips in the first place.
Our guides usually start the trek wearing long, lightweight trekking trousers and wicker (non-cotton) shirts. Long trousers are recommended as a deterrent to insects, stinging plants and to act as sun protection. Shorts can also be worn on the initial few days of the trek as the temperature is usually warm. Ensure that you apply sun protection frequently. Sunglasses are worn for most of the trek in as well as suitable sun-hats.
The prevailing conditions on the trek will dictate what you will wear: if it is cold when you leave the camp in the morning then wear your fleece. As things warm up take advantage of the zipper system which most trekking clothing have and open and /or close the zips to adjust to your own preferred temperature. If you get too warm then take a layer off.
Waterproofs are needed on hand at all times. Mera is a huge mountain that creates its own weather system. It is not unusual to be caught out in an afternoon rainstorm low down on the trek.
Waterproofs should be Gortex material or similar. Over the top of your clothing you will wear a climbing harness and you will be attached to a rope when on high passes/summit day.
What do our guides wear on summit day?
On summit day it gets cold and temps of -20 C are not unusual.
Typically our guides wear 2 sets of base layers (long Johns), a thick fleece layer (top and bottom) and then on the legs waterproofs whilst on the upper torso a down jacket is worn. As the wind picks up near the summit ridge our guides will put on their wind proof layer to ward off the wind-chill. On their hands they’ll wear a thin layer of fleece working gloves over the top of which a thicker set of ski gloves or mittens is worn. Their heads are covered by a thermal “beanie” hat or a thick balaclava and the hood of their down jackets. On their feet the guides wear one thin sock and one thick sock.
On summit day our guides wear snow goggles. They also use waterproofs as an invaluable wind shield to protect themselves against the effect of wind-chill when a strong wind blows.
How much kit can I bring with me?
The Kathmandu-Lukla flight has a strict 15kg weight limit which includes both your hand luggage and your checked luggage.
Your summit specific kit (which we often refer to as mountain hardware) will be packed into bags and flown out separately. You will be reunited with this kit at Khare and it will not be part of your 15kg.
What makes up my 'mountain hardware'?
Mountain hardware includes your high altitude boots, climbing harness, helmet, karabiners, slings, ice axe, crampons and your jumar.
What will happen to my mountain hardware during the climb?
All mountain hardware is flown out seperately to your main kit and is most often taken directly to Khare by porters. You will not see this equipment again until you need it.
Once you are back down from the summit, this kit will once again be packed up and taken on by our amazing Sherpa support crew. You will be reunited with it in Rhamchhap.
What is the best type of footwear to use?
High altitude mountaineering boots are essential for climbing 6,000m peaks. You will only be using these for the mountain phase of the expedition and you wont be wearing them on the trek to Everest Base Camp. These boots should be double or triple layered. Either La Sportiva G2 SMs, Scarpa Phantom 6000s, La Sportiva Spantiks or 8,000m boots are suitable. Temperatures high on the mountain are usually well below -20 and only these mountaineering boots can withstand such conditions.
Ensure that you have tried the boots on before you leave home and that you can wear a thin and a thick pair of socks in them and still be able to wriggle your toes.
Because of the huge variety of terrain encountered on the trekking phase it is very important to wear the right footwear. Trekking boots should be sturdy, waterproof, insulated against cold temperatures and offer adequate ankle support.
In addition it is highly recommended that your boots are well worn in to prevent the formation of blisters. A range of suitable boots are on the market and further advice as to which brand names are available can be found online or at your local gear store.
Crampons are worn for the majority of the time you are on the glacier and for the actual summit day itself. Your crampons should preferably be of the easy “heel clip” variety (rather than the strap systems which are fiddly). It is not necessary to use specialist technical climbing crampons as standard 12 point all round crampons such as those from Grivel will do the job very well.
What clothing and footwear is appropriate when staying in the tea houses and lodges?
There is no electricity above Lukla and lodges are heated by a pot-bellied stove fuelled with either wood or yak dung. These provide adequate warmth for the dining rooms but are not connected to the bedrooms. A thick fleece or light down jacket provides adequate warmth for inside the buildings. For footwear we suggest using either trainers (sneakers) or crocs. It is nice to get out of your trekking boots and to have something light to wear for the evenings.
How warm does my sleeping bag need to be?
Sleeping bags should be rated within the -25 C comfort zone. It is not unusual to experience frosty nights and a good night’s sleep is important to giving you the best chance to climb this mountain. Ensure you get a sleeping bag that has this temperature rating at this comfort zone rather than as its extreme zone.
Our guides take sleeping bags rated to well below -25C to ensure that they are warm at night. A 5 season sleeping bag can be enhanced by using an inner silk or fleece bag (or similar). The idea is to be as comfortable and warm as possible for the night and henceforth to ensure plenty of sleep for the arduous days ahead. Some clients have found the use of a “Bivouac bag” to increase the warmth of their bag.
It is important to remember that down sleeping bags work by your own body heating the down that’s inside the bag. Once you have warmed up the bag the down will retain the heat and ensure that you sleep at a temperature that’s your own body temperature. For best results it is best to wear as little as possible when inside your sleeping bag. Our guides will often only wear a set of thermals in their bag. It is important for the bag to trap the heat. By wearing multiple layers of clothing your clothing will trap this heat and your bag will not function properly.
Are down jackets necessary?
They are highly recommended and are worth their weight in gold on summit day. Our guides wear them every evening from the first camp up. A layer system comprising of several base layers, fleeces, jumpers and a thick jacket will suffice on most summit nights but nothing beats the efficiency of a good down jacket (especially when topped with a waterproof layer).
Are down & waterproof mitts necessary?
Our guides say these are an absolute must for trekking at higher altitudes. Warm mountaineering gloves will not suffice. You should ensure that your warm gloves fit inside your down mitts, which in turn fit inside your waterproof mitts.
How much will my pack weigh during the trek?
A daysack is worn by the climber at all times during the trek. The content of this is mandatory and should include: a fleece (for when taking breaks or the weather changes); a full set (top and bottom) of waterproofs; sufficient water for the day; snacks; camera equipment; personal medication and a head torch.
Your day-to-day rucksack will weigh no more then 3 – 4 kilos and a rucksack of around 30 – 40 L capacity will more than suffice.
This rucksack can be filled to the brim with extra stuff when checking in at the airport. Our guides for example put their down jackets or a thick fleece and a pair of mountain socks in this bag so as to free up space in their hold luggage.
It is important that your day sack has an adjustable waist belt to transfer the weight of your daily load onto your hips and from here onto your legs (strongest muscles) to do most of the carrying. Another handy feature would be a compartment in which to fit a platypus/camelbak or water bladder.
Your main luggage will be carried by porters.
What do the porters carry? What is the correct porter weight?
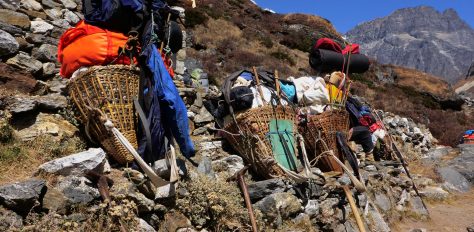
Your porter bags should be off a soft material “duffel bag” or rucksack variety and should not be a suitcase or hard bodied metal case. Furthermore they should weigh around 15kg when packed for the trekking phase of the expedition. On all our Mera peak treks we have found this weight to be ample and usually everybody can plan to take only enough clothes and equipment needed for the mountain.
Please bear in mind that on top of your load, porters will also have to carry a share of the food, kitchen equipment, camping equipment and their own survival gear.
Inside the porter bag should be a change of clothing, your clothing for higher up the mountain, sleeping bag, personal toiletries etc. (see equipment/clothing list). Also take a pair of light shoes to wear at camp at night (crocs/trainers) and consider bringing a book or playing cards.
What clothing is suitable for when we come back from the mountain?
Kathmandu is at a relatively low altitude and daytime temperatures are warm. When in Rome do as the Romans! Shorts and T-shirts are fine to wear during the course of the day. Evening wear generally tends to be casual with long trousers and casual shirt appropriate for all hotels and restaurants.
Nepalese are generally quite conservative in their dress code and are generally well dressed despite their situation in life. Your town and party clothes can be left in a safe lock up at the hotel and do not need to be taken up the mountain.
What other kit will I need?
Please review the kit list. While all items are required there may be times when some of the items on the kit list may not be used (such as warm weather or changing conditions). The kit lists are created by the guides to ensure climbers are prepared to summit in any conditions.
Are there clothes washing facilities on the trail?
There are no facilities for you to have your washing done and dried whilst on the trail. Anticipate not washing kit and take as many pairs of underwear as you are comfortable with in this scenario. Don’t overpack on the baselayers and midlayers though as there’s a strict weight limit on the Lukla flight of 15kg.
Is it possible to rent equipment before I go?
It is possible to hire clothing and equipment from our partners Outdoor Hire (www.outdoorhire.co.uk/360-expeditions-kit-lists) where we have a Mera Peak kit list set up and you can pick and choose hire items from this.
Expedition Kit Hire (www.expeditionkithire.co.uk) also have a range of high altitude mountaineering boots for hire along with warmer sleeping bags.
Is it possible to rent kit once I'm in Nepal?
We have a really good link to a great outfitter in Nepal, where they sell / rent quality outdoor kit at a fraction of the cost of the UK. The following items are available to rent when you arrive: down jackets, ice axes, crampons, sleeping bags, high altitude boots, climbing harness, climbing helmets & jumars.
If you do want to hire any of these, please let us know in advance of the expedition so we can get a list together for our ground crew.
The Weather
What is the best time of year to climb in Nepal?
The best time to climb the Nepali 6,000m Peak is March to May and September to November. The later time frame is generally clear but colder with snow conditions more stable. The usual weather patterns which came with great predictability are changing however and it is not unusual to experience short spells of warm weather which is unprecedented.
How cold can it get?
The temperature at the top of the mountain can vary widely. Sometimes it is only a degree or two below freezing, but climbers should be prepared for possible temperatures as low as minus 25 degrees Celsius, especially in conjunction with wind chill.
On the trek expect cold mornings (sometimes frosty). An afternoon rainstorm is not unusual at the lower altitudes.
Travel
Do I need to book my own flights to Nepal?
360 Expeditions will be booking flights on your behalf. We provide confirmation of flight times and departure terminal approximately eight weeks before your departure date. Please be aware that flight schedules are subject to change. Please ensure that you have checked flight details before setting out for your flight.
Which internal airport in Nepal do we fly from?
The Civil Aviation Authority of Nepal announced in October 2022 that there were too many flights leaving Kathmandu to Lukla, and deemed it too dangerous to continue, which means there are no longer flights between Lukla and Kathmandu during peak trekking season. Peak season is defined as April 1st – May 30th and October 1st – November 30th each year. This change affected all airlines and tour operators in Nepal and means the only option to travel to/from Lukla by plane is now from Manthali airport in Ramechhap.
Insurance
Do I need special travel insurance for the trek?
You must carry individual travel insurance to take part in the trek. We cannot take you on the mountain without proof of insurance.
It is your responsibility to ensure that you have the appropriate insurance for your intended trip. To include medical evacuation and coverage up to the maximum altitude of this trip.
Your insurance details are requested on the booking form, however this can be arranged at a later date. 360 Expeditions will be requesting your insurance details 8 weeks before your departure.
Entry into Country
My passport runs out 3 months after the trek, is this OK?
Your passport should be valid for 6 months after the date the trek starts. If it runs out before you may be refused entry. It is also advisable to have a couple of photocopies of your passport in case of loss
Do I need a visa for Nepal?
Visas are compulsory for entry into Nepal for all foreign nationals. You can either apply for your visa on arrival in Nepal, or in the UK before you travel.
If you decide to apply before you go, you may be selected to attend the Nepalese Embassy to collect your visa. If this is the case, you’ll be given a set day and time when you have to do this. If this happens and you can’t make it to the embassy, there are a couple of options:
1. you can nominate someone to go on your behalf.
2. you can ignore the request to go to the embassy and sort your visa on arrival. There will be no issues getting your visa on arrival even if you’ve already started the process in the UK.
It is very easy to get your visa on arrival in Kathmandu and there are now electronic visa booths at the airport which take your photo, allow you to fill in all the relevant information and spit you out the completed visa application. You then just queue to pay your fee!
A 30 day visa costs US$50.
Finance
When is the money due for this expedition? What kind of payment do you accept?
Generally speaking deposits are due upon booking to secure your place as we need to book the international flights well in advance. The full amount should be paid 4 months prior to departure. However having said this our aim is to get you to the top of this mountain and we understand that everyone’s personal financial situations can vary.
Please contact our friendly office crew to discuss a suitable payment plan should you find raising the funds to be difficult. We have been in your shoes and go by the motto of where there’s a will there’s a way.
What is your cancellation and refund policy?
Please read our terms and conditions careful before you depart. 360 Expeditions highly recommends trip cancellation insurance for all expeditions. Due to the nature and heavy costs of government and operator permits we must adhere to a stringent refund policy.
How much do we tip our local crew?
Our local crew work extremely hard to ensure that your expedition runs well. Although tipping is not compulsory once someone sees how hard the crew works and realises the minimal amount of money they get paid relative to us, tipping will seem the least they can do to say thank you. As a general rule we suggest around $250 per client for the entire local crew to be shared amongst them.
Tipping your 360 leader is entirely your call.
Money: am I correct in thinking we only need to take US Dollars with us?
US dollars are readily recognised and are easily converted to the local currency. Upon arrival there will always be a bureau de change at the airport. These provide a better rate of exchange than your hotel. Buying gifts or small goods such as drinks or snacks with small denomination US dollars is not a problem. Getting change for a $20 bill when buying a $1 coke will be a problem. Larger bills are good for tipping your porters at the end of the expedition and a sufficient amount should be carried with you. Your 360 leader will remind you in the pre-expedition brief of the correct amount to take on the trip with you.
What additional spending money will we need?
The amount of money you will need depends on how many presents you wish to buy or how much you have to drink when you come off the hill. As a basic rule of thumb $250 should be more than adequate for any post expedition spending.
Nepal is a relatively cheap place and when indulging in the local custom of haggling goods can be bought for very good value for money. Your 360 leader will be happy to point out the relative bargains and the suitable prices and where to get the best value for money. The only cash you’ll need to consider taking with you on the mountain is the local crew tips which are presented to them before we leave Lukla (see above) and for any additional snacks and soft drinks you wish to purchase from the Lodges encountered en route. Additional supplies can be quite expensive though as all this is brought in by porters.
Electronics
Do we need a travel adaptor for the plug sockets in the hotel or are they the same as UK?
The voltage is 220v / 50Hz like the UK. Rectangular or round three-pin plugs are used. It is possible to recharge your electronic items and batteries for a small cost at some of the lodges.